GL2610XT:


I recently got one of these from a friend who bought it on e-Bay. These devices are complete vestigal sideband
video modulators in a rack mount chassis. The 'agile' term refers to the fact that the RF output
frequency of the device can be set via front panel switches. This devices are designed to be used
in a CATV head end installation, and as such, output low level RF, on the order of ~+10dBm (~60dBmV)
Users manuals for these things are practically non-existant, as the company who manufactured them has
been out of business for many years now. Google searches turn up little info, so I just hooked it up and started
playing. Here are my results.
Front Panel Info:
| Front Panel Indicators and Controls: L-R |
| Name | Function | Type |
| POWER | Power On/Off | Locking Toggle |
| MOD ADJ, VIDEO | Adjustment of video input level | Trimpot |
| MOD ADJ, AUDIO | Adjustment of audio input level | Trimpot |
| OVER MOD, VIDEO | Indicates when sufficient video is present | LED |
| OVER MOD, AUDIO | Indicates when sufficient audio is present | LED |
| Level | Unknown | Trimpot |
| | Shows the RF TV Channel Number | LED Display |
| Channel | Selects the output RF TV Channel frequency | Dipswitches |
| RF Level | Adjustment of RF Output level | Trimpot |
Rear Panel Info:
| Rear Panel Indicators and Controls: L-R |
| Name | Function | Type |
| OUTPUT, MONITOR | Monitor port, 20 db down from main output | 'F' Connector |
| OUTPUT, RF | Main RF output port | 'F' Connector |
| IF OUT, VISUAL | IF Output port for visual component, jumpered to IF IN, Visual | 'F' Connector |
| IF OUT, AURAL | IF Output port for aural component, jumpered to IF IN, Aural | 'F' Connector |
| IF IN, VISUAL | IF Input port for visual component, jumpered to IF OUT, Visual | 'F' Connector |
| IF IN, AURAL | IF Input port for aural component, jumpered to IF OUT, Aural | 'F' Connector |
| AUDIO IN | Input for audio baseband signal | Terminal Board |
| AUDIO IN | Input impedance select for audio baseband signal | SWITCH |
| VIDEO IN | Input for video baseband signal | 'F' Connector |
| FUSE | Protection device | FUSE |
| POWER CORD | For connection to AC mains | Power Cord |
| AC OUTLET | A source of 120 VAC to power auxillary equipment | OUTLET |
Initial Setup:
Connect your stations audio signal (line level input, no mikes) to the audio input terminal board.
Select the appropriate input impedance of the driving device, e.g. line output from mixers and
cameras should probably select 10K. Connect your baseband NTSC signal from camera or SEG to the Video input
jack. If your station uses RCA or BNC's you'll have to adapt this to an 'F' connector. Connect AC plug to
a source of 120 VAC and power on the unit. You should see the channel display lite up.
With your normal sources of video and audio applied (use a tone for audio, if needed), adjust the
video modulation adjustment trimpot on the front panel up until the led just comes on and then back off a little.
Do the same for the audio signal.
Tuning Information:
To tune the GL2610XT, adjust the dipswitches on the front panel to correspond the desired output channel.
The dipswitches are arranged in a pattern of two rows, one group of eight to the left, and a group of ten to the right.
On my unit the first group of switches to the left is labeled (L-R) 1 through 8, and these correspond to the ten's
digit of the channel number. The second set of dipswitches to the left is labeled (L-R) 0 through 9 and correspond
to the unit's digit of the channel number. To select a particular channel just set the switches
for the desired channel's digits to the up position. All other switches must be in the down position or you'll
get an error (the channel indicator shows 'E'). For example, to program Channel 34, switch 3 in the first (left)
group and switch 4 in the second group (right) would be in the up position. See the chart below for a few of the
popular output channels.
| Channel | Carrier Frequency | Dipswitch Setting |
| 57 | 421.250 | 00001000 0000000100 |
| 58 | 427.250 | 00001000 0000000010 |
| 59 | 433.250 | 00001000 0000000001 |
| 60 | 439.250 | 00000100 1000000000 |
Note: Setting my unit for Channel 60 causes an error on the display for some reason.
Output hookup:
The RF output is available at the RF OUT 'F' jack on the rear panel of the modulator. You can hook this up to a simple antenna inside the house for testing
purposes. The RF output level can be adjusted via the front panel RF LEVEL control. Realize that this is a low level signal, around
10 to 20 mW. You can see this across the room quite easily with a regular ATV downconvertor box, but I suspect that the range
would be extremely limited once the output is run to an external antenna. Tom O'Hara, W6ORG, of PC Electronics, http://www.hamtv.com/ has an app note available that talks
briefly about using the output of an agile modulator to drive his external PA5 20W PA brick ("Driving the PA5 20 Watt amp from 60 dBmv cable TV modulators"). It looks like that even with the output turned
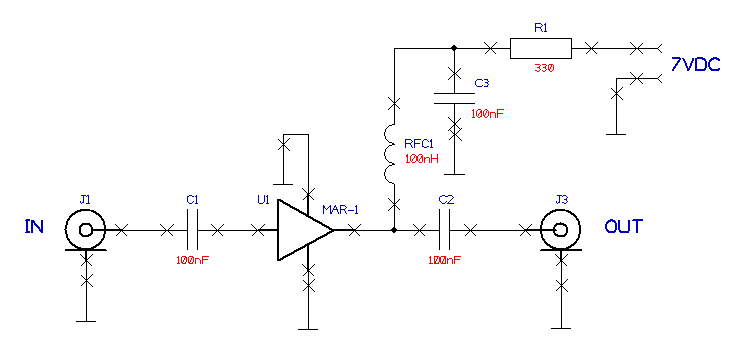
up to max on the GL2610XT, it will only drive the external power amp to about 10W. I am thinking that a simple power gain stage of about 10db
can be added to drive this to full output. I am prototyping one using a Mini-Circuits MIMIC, see the ASCII drawing below.
This is very preliminary and it's quite possible the device I selected will not work in this application. I have'nt gotten around
to doing it yet, so more on that later!
Back to ATV HOME